Configure Auth0 and use it with you Next.js app
Step 1: Configure Auth0
- Log in to your Auth0 account at https://auth0.com/. If you don’t have an account, sign up for free.
- When you signup for the first time, you’ll be asked to create an Auth0 tenant. This tenant name will create a unique #TODO
- In the Auth0 dashboard, navigate to
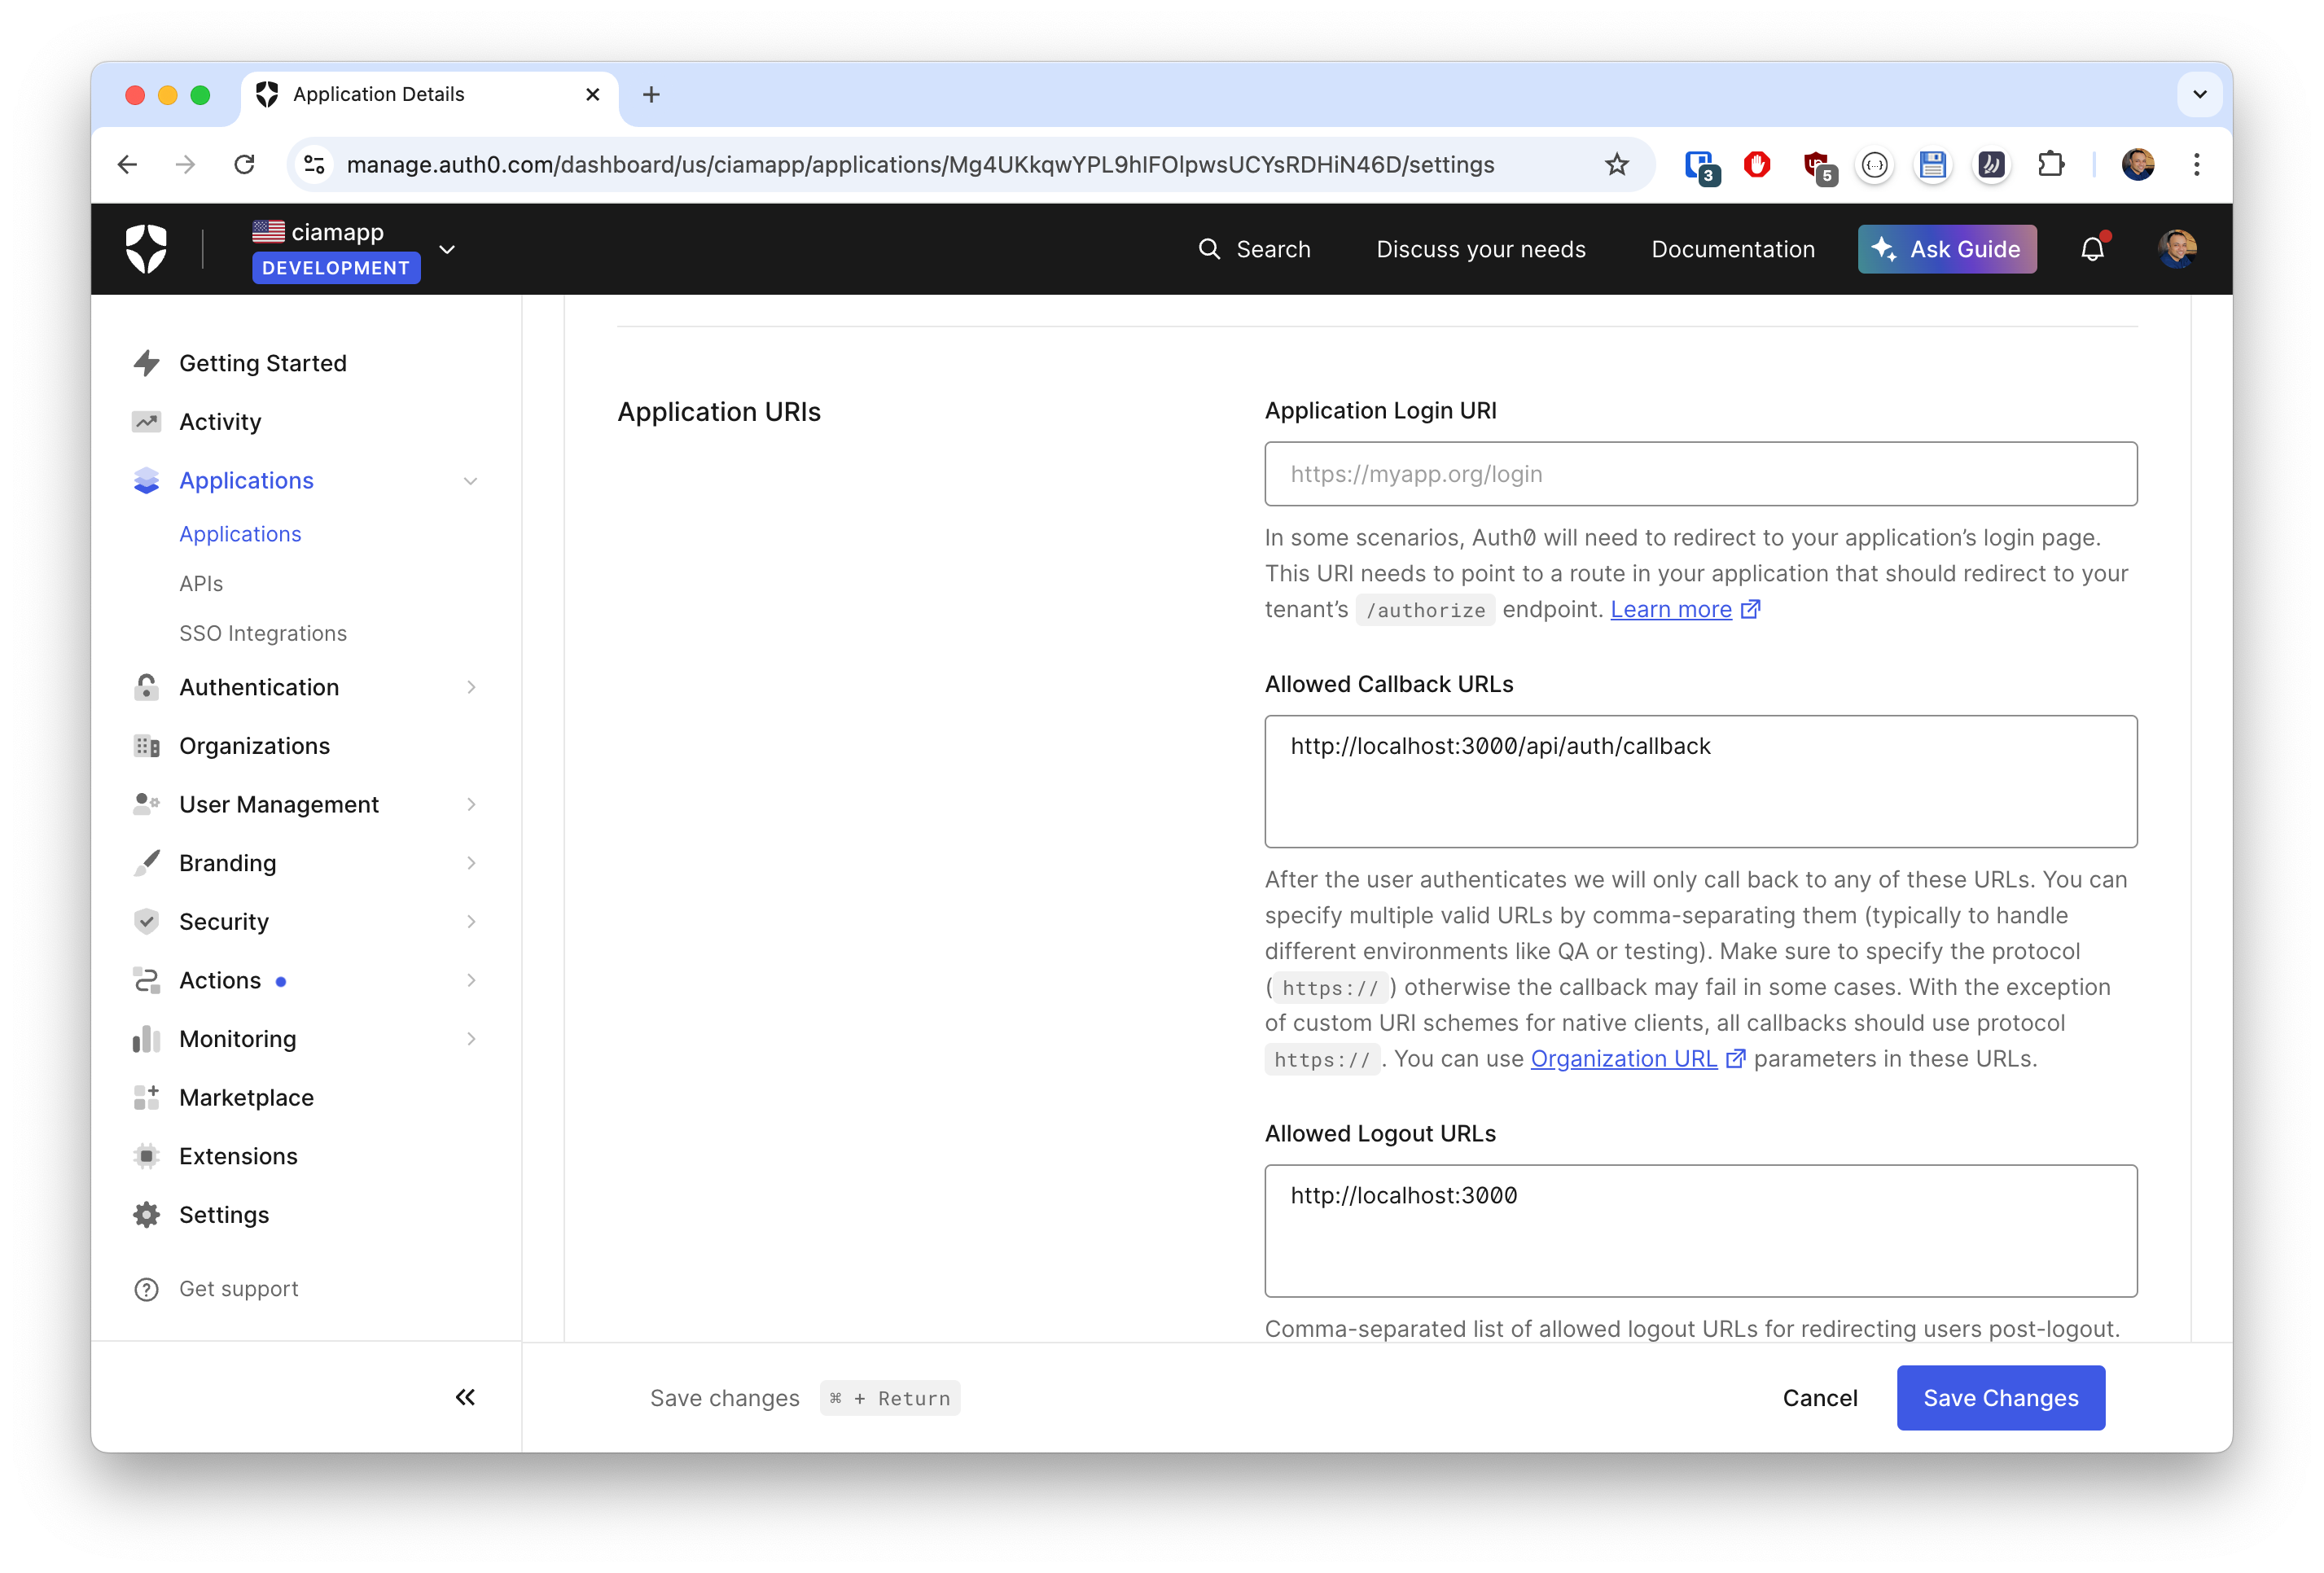
Applicationsin the left sidebar, and create a new app of typeRegular Web App. - Configure the following settings for your app:
- Allowed Callback URLs: http://localhost:3000/api/auth/callback
- Allowed Logout URLs: http://localhost:3000
- Application Logo: Optionally, add a URL to a logo image that Auth0 will use to represent your app on login and consent screens
Leave all other settings as-is for now, and click Save Changes to save your application.
Step 2: Configure app to use Auth0
- Go back to your project’s root directory in the terminal and install the nextjs-auth0 package by running the following command:
npm install @auth0/nextjs-auth0- Create a
.env.localfile in the root directory of your app and add the following environment variables:
AUTH0_SECRET=''           # a long secret string
AUTH0_BASE_URL=''         # Your app's base URL
AUTH0_ISSUER_BASE_URL=''  # Your Auth0 domain URL
AUTH0_CLIENT_ID=''        # Auth0 Client ID from the app configuration
AUTH0_CLIENT_SECRET=''    # Auth0 Client Secret from the app configuration
AUTH0_SECRET
To generate a long random string for AUTH0_SECRET, you can use one of the following commands in your terminal:
~ $ openssl rand -hex 32
843b730c0b510d701522373808b7f9bec8fe3eb152e7a460698e596290df666e
~ $ node -e "console.log(crypto.randomBytes(32).toString('hex'))"
9c8c19922c08c4b4952daa808041e9676991cfe0ada4adb40d4dc7f300ef50aaAUTH0_BASE_URL
This is the base URL for your Next.js app. For now set it to http://localhost:3000 where your app runs on your local machine. Later, we’ll deploy the Next.js app to a cloud platform like Vercel, and configure a domain name, and we’ll have to change this value to that new domain name.
AUTH0_ISSUER_BASE_URL
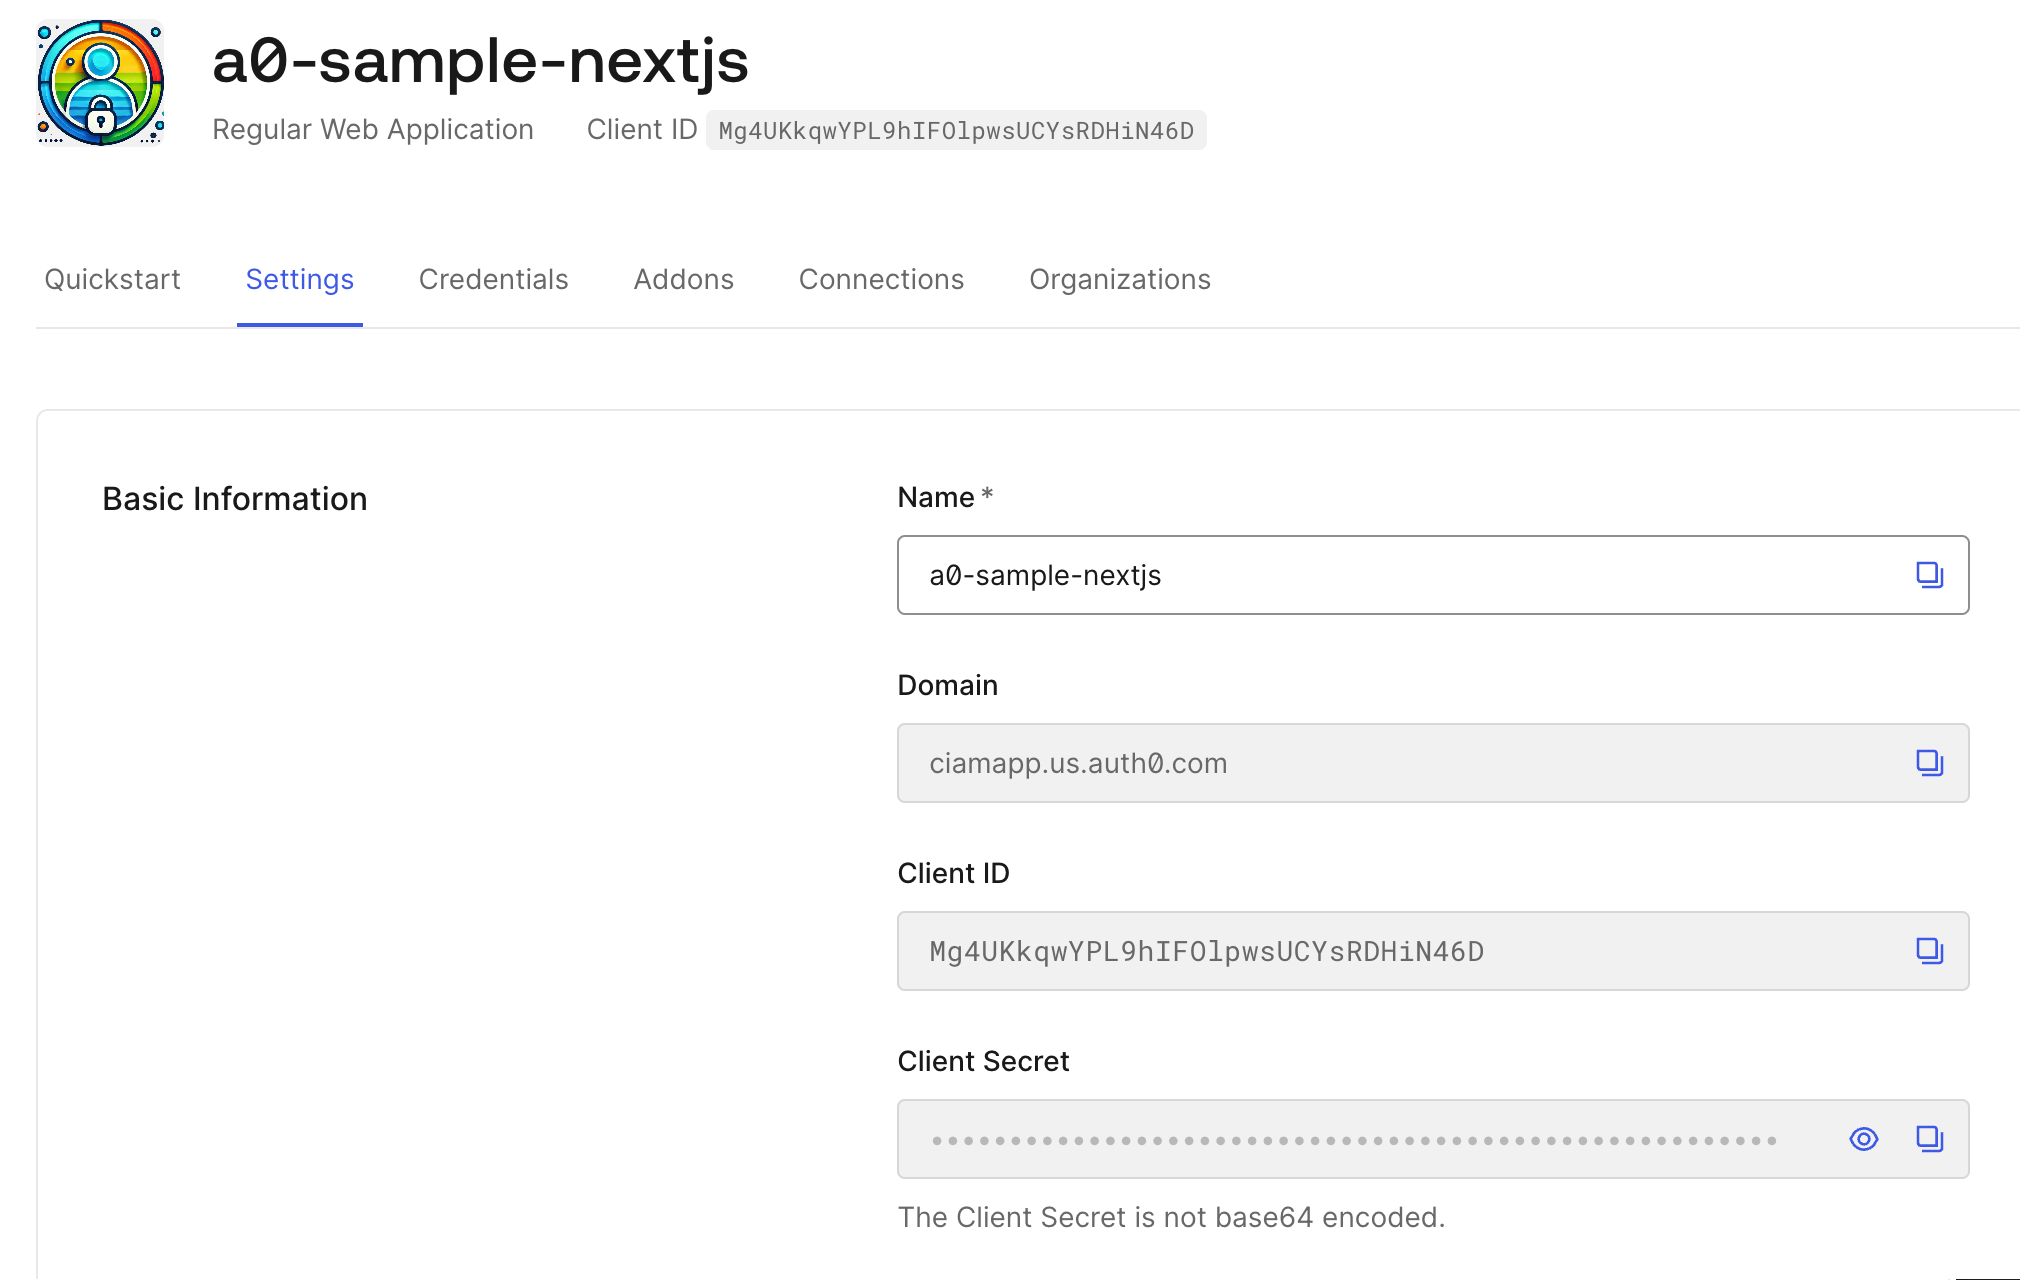
This is the URL of your Auth0 tenant’s domain. In our case, this would be https://ciamapp.us.auth0.com.
AUTH0_CLIENT_ID
This is the Client ID of the app you just configured in Auth0. Copy-paste it from the Auth0 dashboard.
AUTH0_CLIENT_SECRET
This is the Client Secret of the app you just configured in Auth0. Copy-paste it from the Auth0 dashboard.
Here’s an example of what your .env.local file might look like:

Step 3: Use nextjs-auth0 SDK
Here’s an overview of the changes we’ll be making in the Next.js app. We will:
- Create a new Next.js API route handler that will use
nextjs-auth0SDK’shandleAuth()method to dynamically create the following route handlers for us:/api/auth/login- your app calls this to login a user/api/auth/callback- Auth0 redirects back to this after a successful log in/api/auth/logout- your app calls this to logout a user/api/auth/me- used to fetch the user profile
- Create a custom route handler (
/api/auth/signup) for thesignuproute, which will directly open the signup screen. - Update the
app/layout.jsto use theUserProvidercomponent. - Update
app/page.jsfile to consume Auth0 authentication and get the value of theuservariable for the logged-in user.
Let’s get started.
1. Dynamic API routes
(a) Create a route.js file with the following directory structure in your app:
/app/api/auth/[auth0]/route.js
(b) Add the following code to route.js:
import { handleAuth } from '@auth0/nextjs-auth0';

export const GET = handleAuth();
The handleAuth() method dynamically creates the following route handlers for us:
/api/auth/login/api/auth/callback/api/auth/logout/api/auth/me
2. signup route handler
Update your route.js file from the step above as so to add a custom signup route handler:
|
|
This passes the screen_hint parameter to Auth0, and the Sign Up page is shown instead of Log In.
3. Wrap with UserProvider
Update your app/layout.js to include the UserProvider component, which manages user session context throughout your app:
|
|
4. Use useUser hook
(a) Update app/page.js to import and call the useUser hook so that we can access user properties like email, picture, nickname, etc. from the ID token returned by Auth0 upon a successful login.
(b) Use the login, signup and logout route handlers we configured in the steps above.
(c) We’ll also print out the user object using JSON.stringify(user, undefined, 2)
|
|
Step 4: Test the entire flow
Go ahead and rerun the app using npm run dev if it’s not already running in the browser.
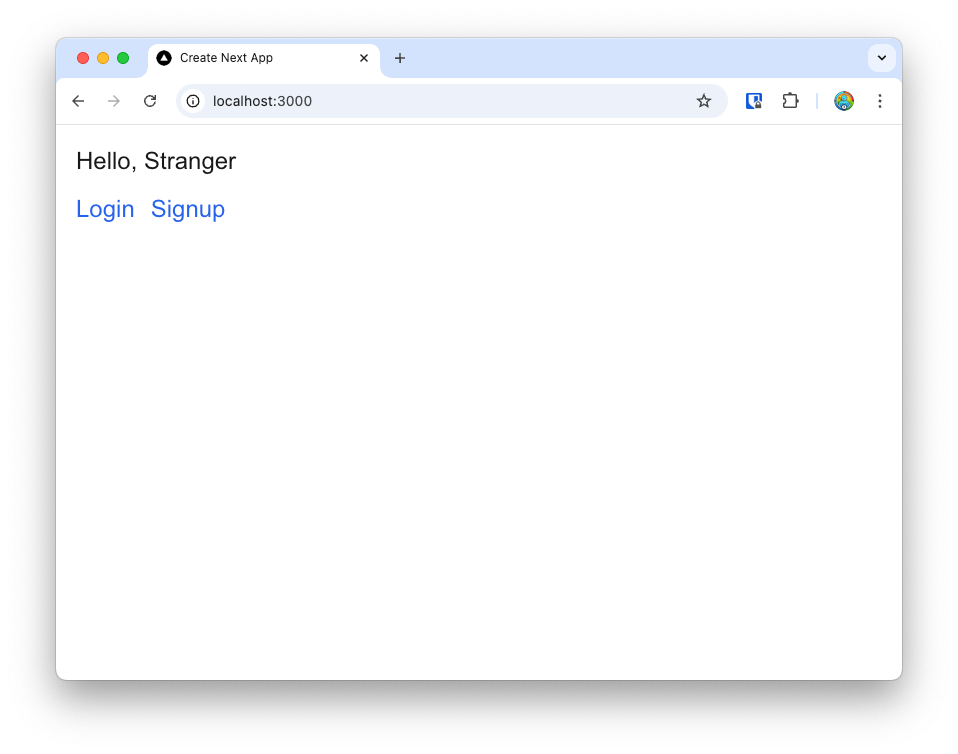
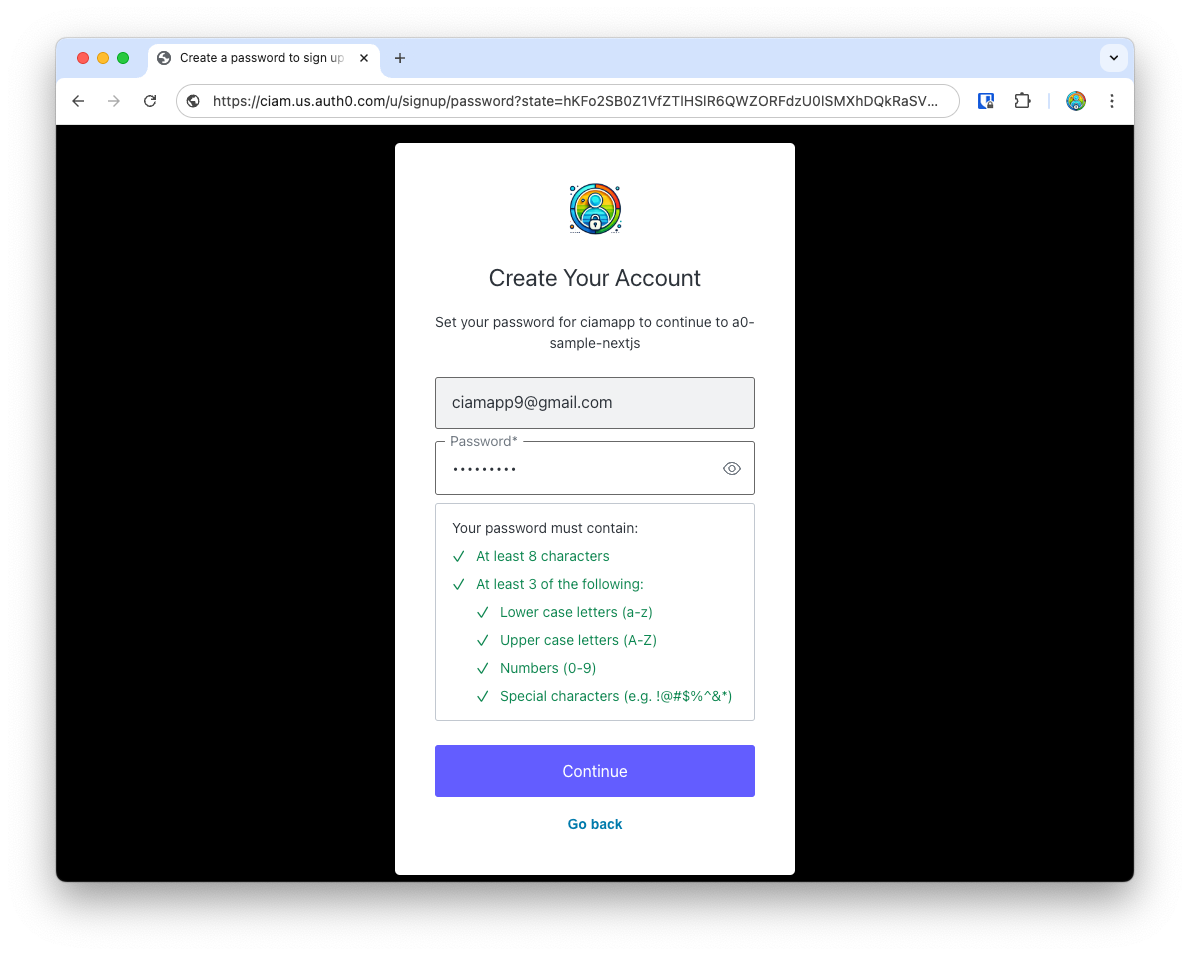
Signup new user
Let’s first click on Signup to create a new user in Auth0. Clicking on the Signup link opens up Auth0’s Universal Login with the signup screen.
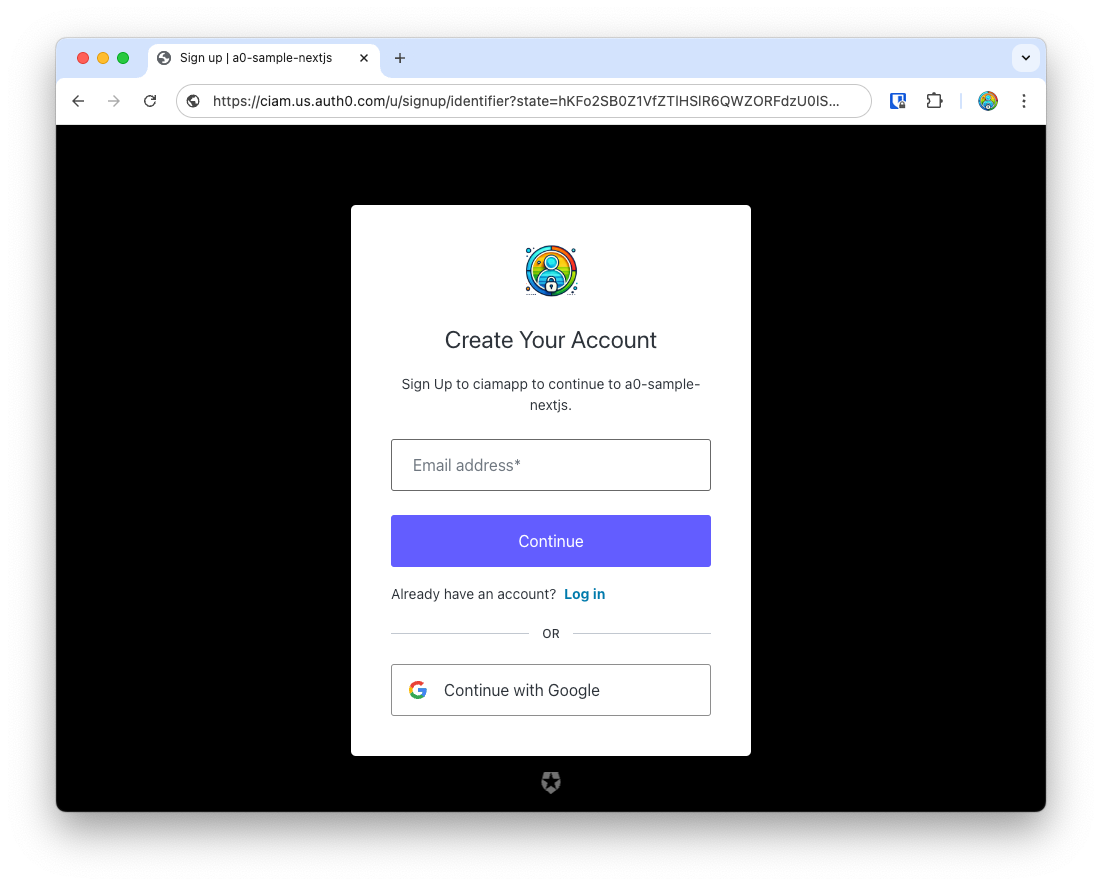
Create a strong password. Later, we’ll learn how to easily configure password policies in Auth0 dashboard.
When you click Continue, the first time around, Auth0 will ask for the new user’s consent before creating a new user, and logging them in.
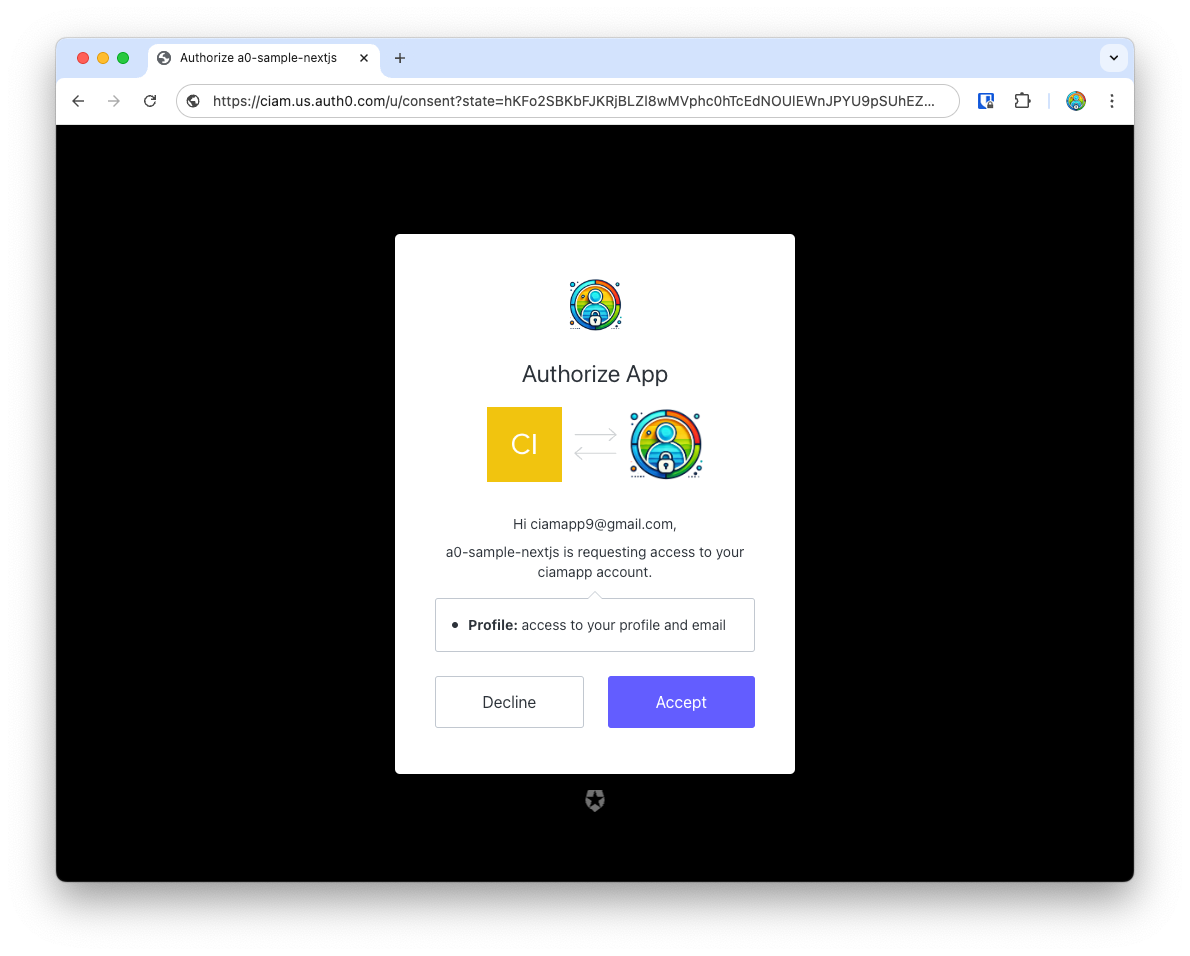
Once you Accept the consent, you’re now signed up and logged in. Auth0 now redirects you back to your app, and you’ll see the “logged in” page with details of the user, including the user object that we printed on the page.
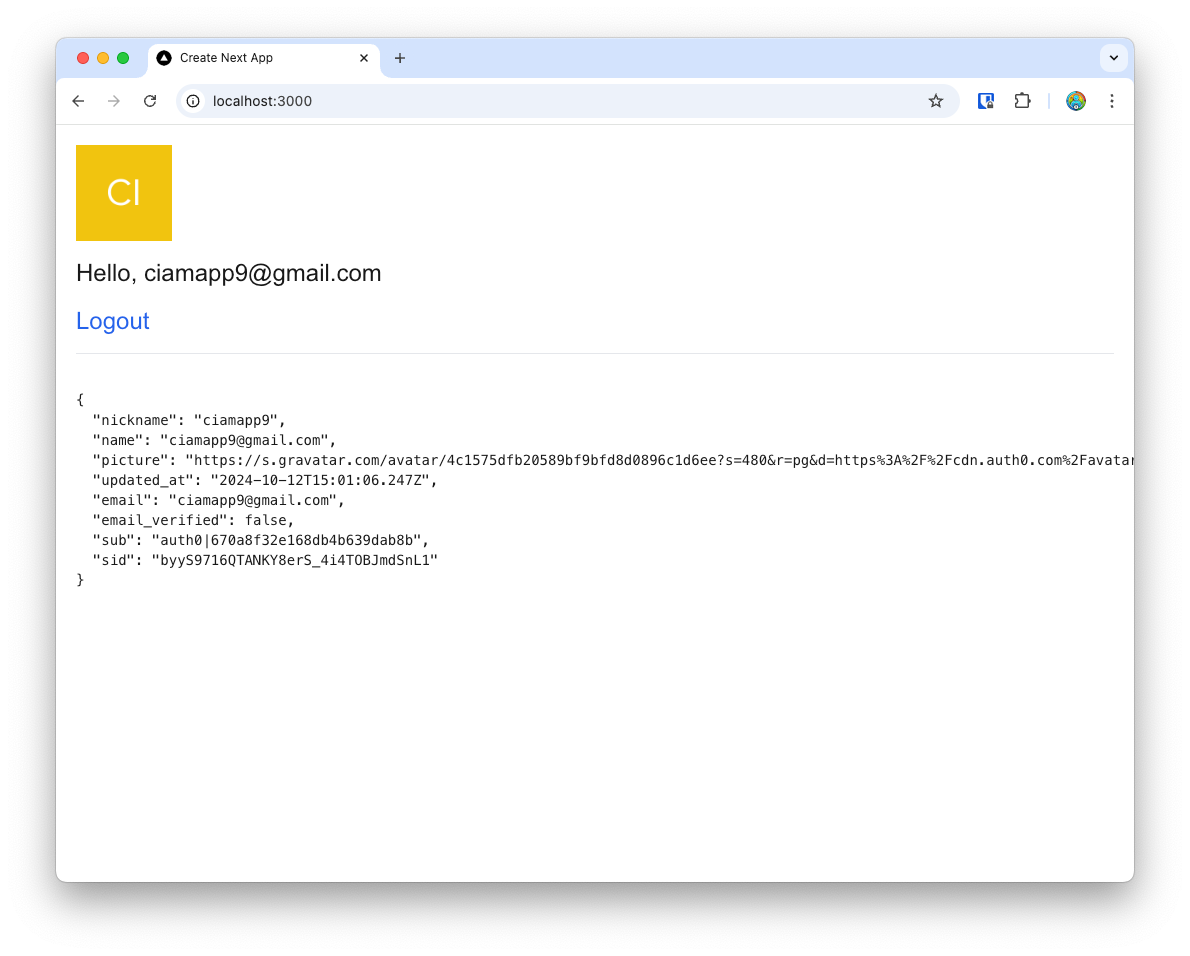
Note, the user object has other properties like:
sub: a unique identifier that Auth0 creates for the usersid: a unique identifier for the session that’s created on the Auth0 side for this login
{
  "nickname": "ciamapp9",
  "name": "ciamapp9@gmail.com",
  "picture": "https://s.gravatar.com/avatar/4c1575dfb20589bf9bfd8d0896c1d6ee?s=480&r=pg&d=https%3A%2F%2Fcdn.auth0.com%2Favatars%2Fci.png",
  "updated_at": "2024-10-12T15:01:06.247Z",
  "email": "ciamapp9@gmail.com",
  "email_verified": false,
  "sub": "auth0|670a8f32e168db4b639dab8b",
  "sid": "byyS9716QTANKY8erS_4i4TOBJmdSnL1"
}
You can now also try clicking Logout, which calls the /api/auth/logout route, which Auth0 uses to log the user out, and redirect you back to your app’s “logged out” page.
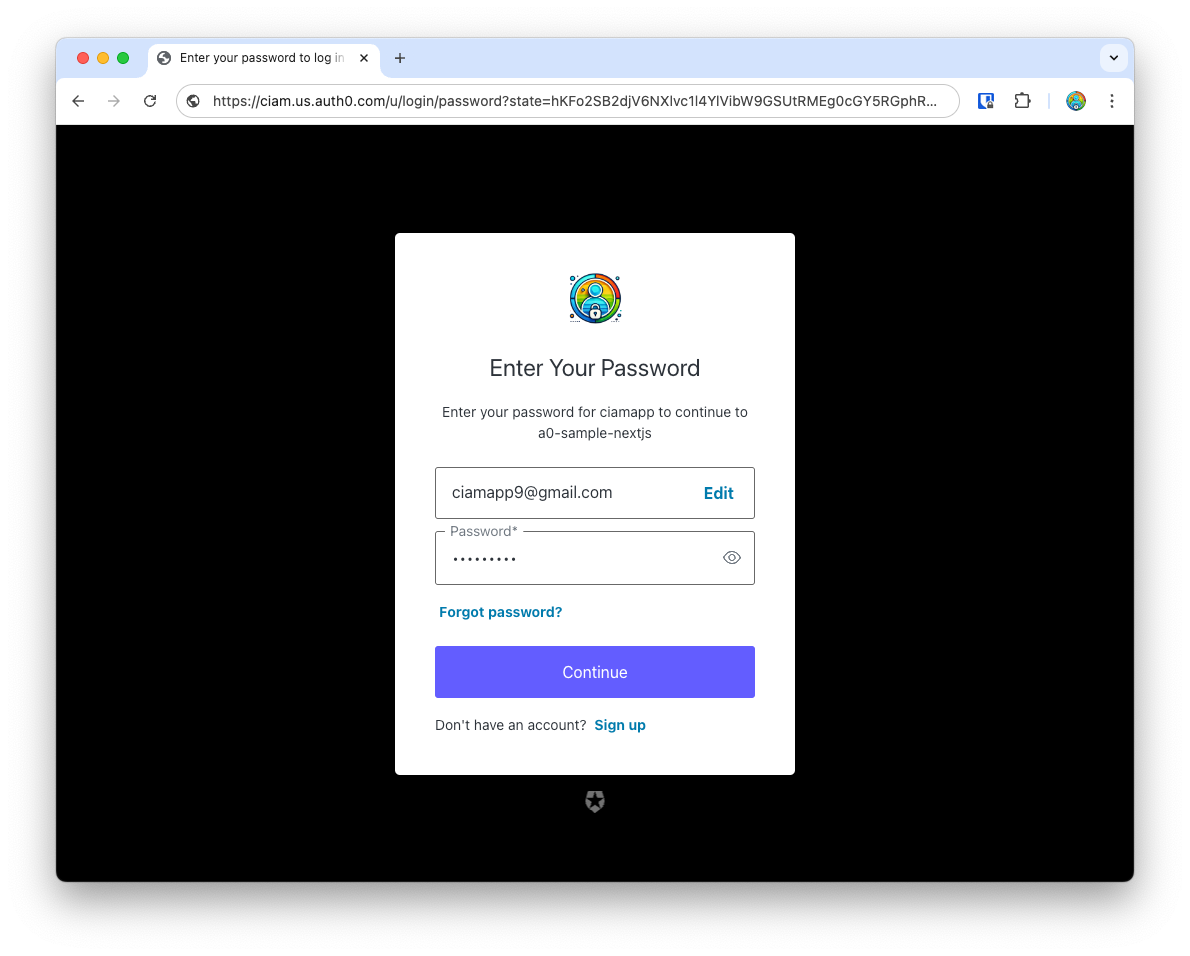
Login with the new user
And the next time, you can click Login to login with the user you just created, which will take you through the Login flow (instead of Signup) to log you back into the Next.js app.
Authentication flow overview
As you use the signup, login or logout flows, you can open up Developer Tools > Network in your browser’s window to analyze the authentication flow, the various redirects and the payloads that are passed around.
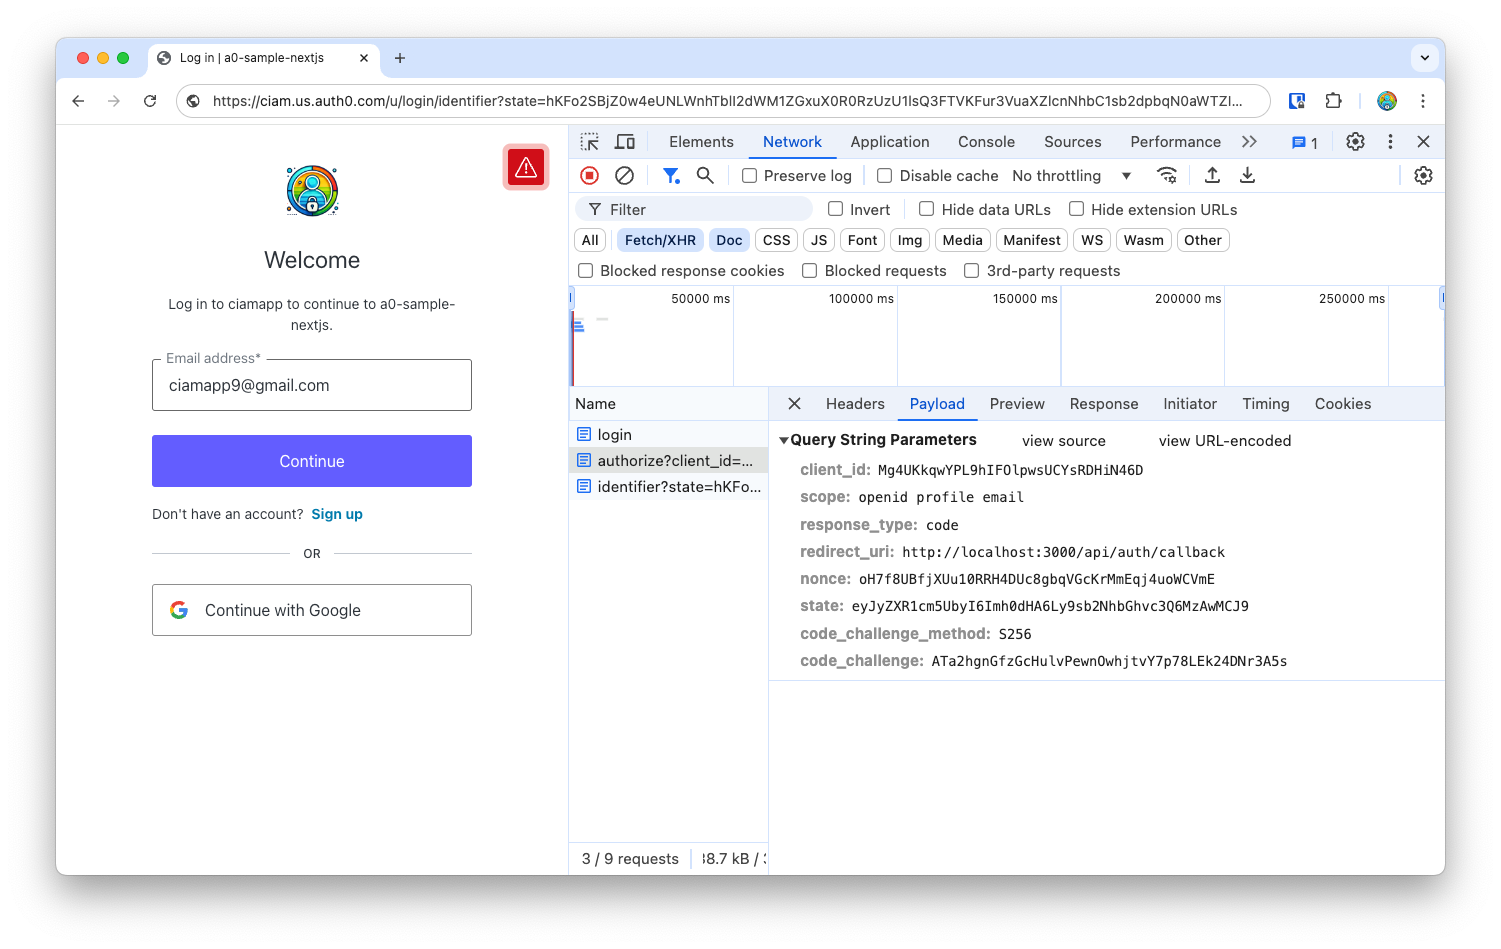
- When you first click
Loginin your app, you’re redirected to the/authorizeendpoint with the necessary parameters to initiated theOAuth 2.0 Authorization Code Flowwhich is a redirect based flow that exchanges an authorization code for tokens (ID, Access and/or Refresh tokens).
-
Once you submit your email and password, the SDK uses Auth0 to authenticate the user, and redirects to your app’s
callbackroute. And, finally, it calls the/api/auth/meroute to fetch details about the user.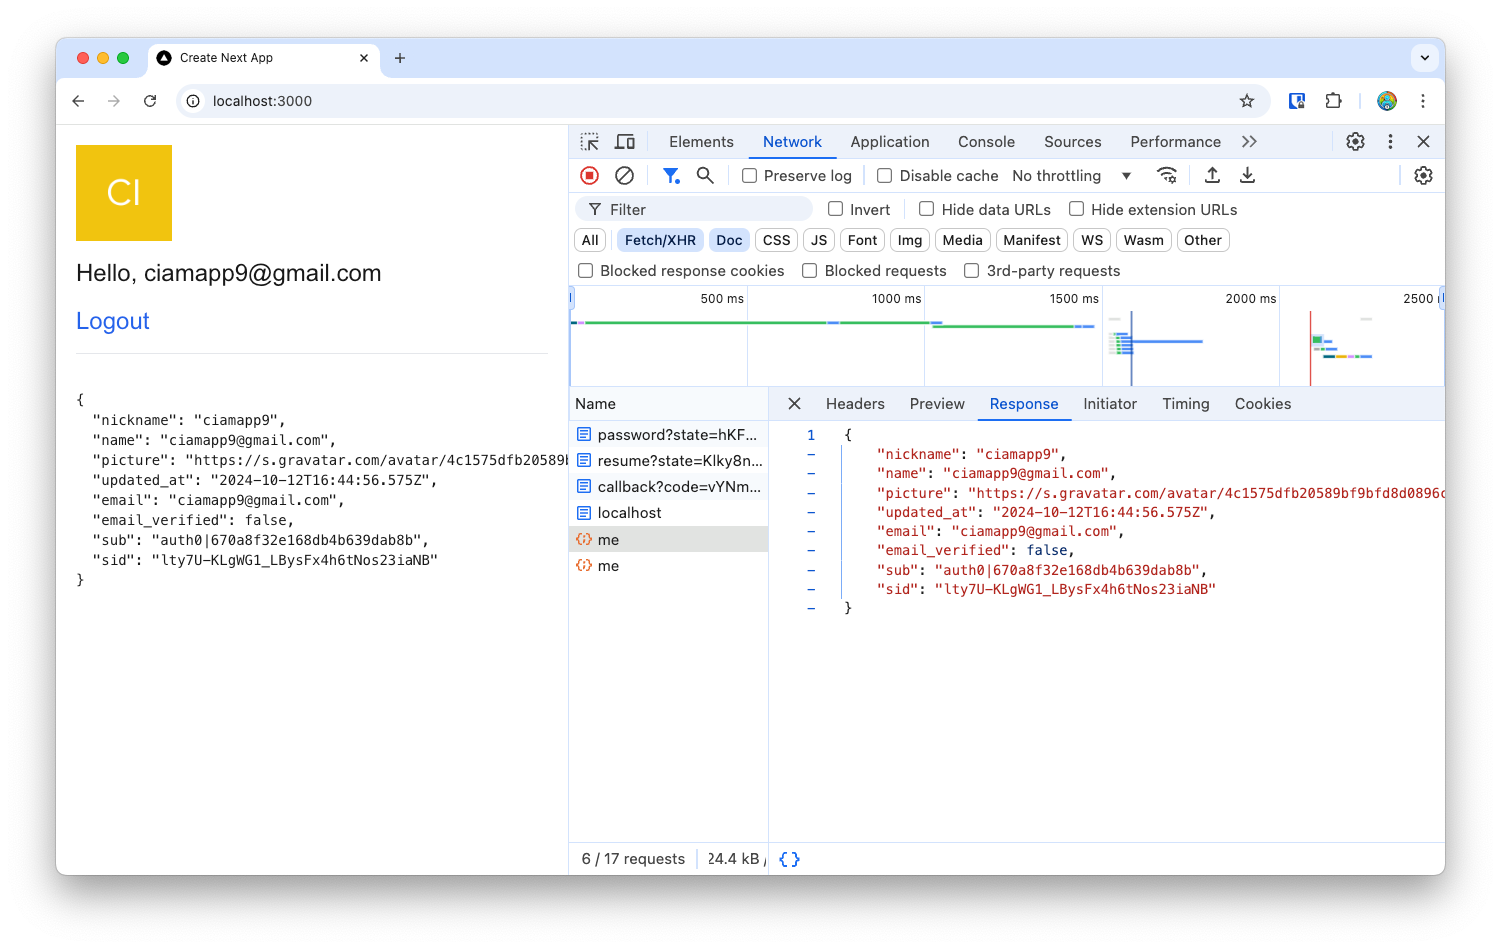
-
The
nextjs-auth0SDK also sets anappSessioncookie that encodes the response from Auth0, including the ID and Access tokens.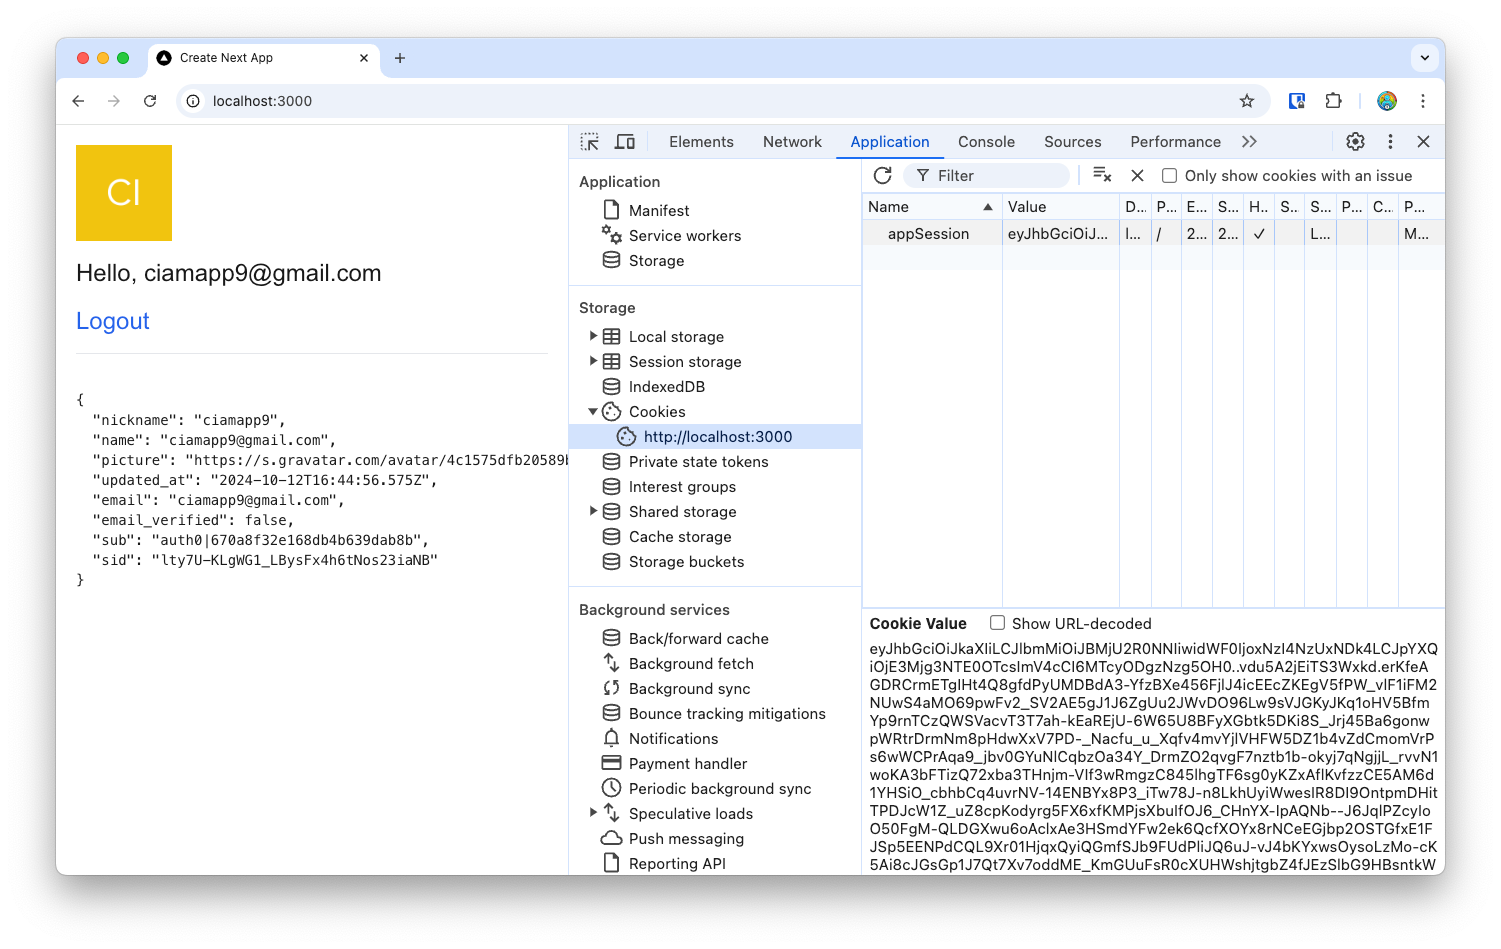
OAuth 2.0 Resources
You can learn about the OAuth 2.0 Authorization Code Flow (and other authentication and authorization flows) in:
Wrapping up
In this post, you went through a detailed setup of:
- Setting up and configuring your Auth0 tenant
- Configuring a new Application in your Auth0 tenant
- Wiring your Next.js app to use Auth0 using
nextjs-auth0SDK - Updating your app to call signup, login and logout routes with Auth0
In the next set of posts, we’ll build upon this basic app that’s now hooked up with Auth0 authentication, to perform other tasks like -
- using custom domains
- handling session management
- email verification
- account linking
- and more..